| View previous topic :: View next topic |
| Author |
Message |
Jonathan Reid
Guest
|
 Posted: Sun Jul 16, 2017 10:35 am Post subject: Forward planning for a Special project Posted: Sun Jul 16, 2017 10:35 am Post subject: Forward planning for a Special project |
 |
|
Hi everyone,
I am looking for some advice. I appreciate these types of posts can be frequent so happy to be redirected to any existing advice I have missed on this site.
I am at the start of researching a new project, which will be to build a Bentley Speciial, based on a mark vi. I saw LOL 750 in Scotland (Applecross Pass) and have been thinking about it ever since. I am on a tight budget (£20-25k) so I plan to gradually build up what I need in terms of parts, doing as much as I can myself, before commissioning a body frame and panels, so that the end product is high quality and well proportioned (low).
From what I can tell so far a Mark vi is my starting point and then sourcing something like a RR B81 would make for a pretty nice set-up. I would predominantly use for touring but dabble in some events, so a "fast road" setup would be my plan.
Beyond this I am pretty much at the start and any advice on best donor car model, where to source (at around £10k), suggested engines and good sources (ex military??), any friendly owners who done the same project I could speak to, etc....
Many thanks!
Jonathan |
|
| Back to top |
|
 |
Christopher Carnley
Joined: 16 Nov 2007
Posts: 2752
Location: Yorkshire, United Kingdom
|
| Posted: Sun Jul 16, 2017 11:21 am Post subject: |
|
|
B80/81, huge lump, 850 lbs all sorts of variants, a lot with cast iron heads.
Most if not all have been bought by Peris Edwards at Racing Green, all have been allocated to build in progress, on 85 MK VI chassis at the last count.
I rebuilt 5 MK VI gearboxes for a guy named Larry Ross abt 3 yrs ago, and he had some B80(?)s Give him a call on 01494 865224, and see if anything is for sale, at probably 60% of yr budget.
Look out all the ads for abandoned projects, or advertise for one.
Ristes had a rebuilt rolling chassis for sale recently, I can't remember if it was £10K or £20K.
All parts are either expensive or extremely rare. |
|
| Back to top |
|
|
Geoff Simpson
Joined: 19 Nov 2016
Posts: 47
Location: Whitchurch, Shropshire & Javea Spain
|
| Posted: Wed Jul 19, 2017 8:09 pm Post subject: |
|
|
| Hi Jonathan and welcome, go down a few post to New Member Mon 21 Nov 2016 Geoff Simpson - I and another member Al Coutts have both started one late last year so already know of some of the problems you will face, pm me with a number if you want to chat - cheers Geoff |
|
| Back to top |
|
|
Stephen Blakey
Joined: 02 Feb 1995
Posts: 1345
Location: Derbyshire, United Kingdom
|
| Posted: Thu Jul 20, 2017 10:09 am Post subject: |
|
|
Hi Jonathan,
Welcome to the forum and good luck with your project.
As well as Larry Ross, Paul Flower is also in the early stages of a straight eight special so it would be worth introducing yourself to him.
There is an ancient thread on the forum in which Ashley James mentions a military surplus dealer who had a lot of RR engines for sale. It's not that long a go you could get a zero-hour B80/81 in a crate for £1000 ish.
My advice would be to stick to the straight six if you wish to compete. The club has recently introduced a "standard special" class which requires a six cylinder engine and drum brakes. If you don't fit into this category you would be competing against V8 specials with up to twice the power of the B80/81 and less weight. I've been watching Bentley specials competing for decades and have never seen anyone competing a straight eight. I wonder if anyone else has seen one on a track?
You're looking at a 4-5000 hour project here. Installing the straight eight is an engineering project in its own right and may be enough to make the project untenable as, given your budget, you're not going to be able to draft in hundreds of outside man-hours.
On the engine front, I've an pal who is building up an FB60 engine to go in a special. It's a fine engine and he bought it for £100. He's hoping for 200 BHP with some tuning. "What about a flywheel?" says I." Oh that's easy", says he, "I'll make one. I've done it before".
I'm encouraging him to join the BDC as we need all the subscriptions we can get to pay our burgeoning wage bill. |
|
| Back to top |
|
|
Jonathan Reypert
Joined: 06 Dec 2017
Posts: 1
Location: Amersham, Bucks
|
| Posted: Mon Jan 08, 2018 6:14 pm Post subject: Any progress? |
|
|
Hello Jonathan,
I too am new here and also a Jonathan which could be confusing.
I'd be interested in progress on your project since the first post in July. I have a Mk IV, already a special but it needs work as it was kept in a field for 10 years! Also needs chassis mods to move the engine back and I want, as you do, to do everything (or as much as possible) myself. I'm totally willing to collaborate so that knowledge can be shared.
I always wondered how a Mk IV special would behave with a W12 engine installed and for £5k off ebay, why not, might need a brake upgrade though I guess!
I am based in south Bucks. |
|
| Back to top |
|
|
Al Coutts
Joined: 25 Sep 2016
Posts: 108
Location: Norfolk, United Kingdom
|
| Posted: Wed Jan 10, 2018 10:36 pm Post subject: |
|
|
Hi Jonathans,
I've modified my chassis and the engine (straight 6) is now 14" further aft. I had planned to lower it but that is probably a step too far as I'd need to cut down the chassis rails to accomodate the gear lever on the right hand side.
I've started making engine mounts. Happy to share my very limited knowledge as Geoff suggested a few months ago.
Al |
|
| Back to top |
|
|
Christopher Carnley
Joined: 16 Nov 2007
Posts: 2752
Location: Yorkshire, United Kingdom
|
| Posted: Thu Jan 11, 2018 11:19 am Post subject: |
|
|
Al,
Have you any pictures of it? |
|
| Back to top |
|
|
Al Coutts
Joined: 25 Sep 2016
Posts: 108
Location: Norfolk, United Kingdom
|
| Posted: Thu Jan 11, 2018 8:39 pm Post subject: My fuselage.. |
|
|
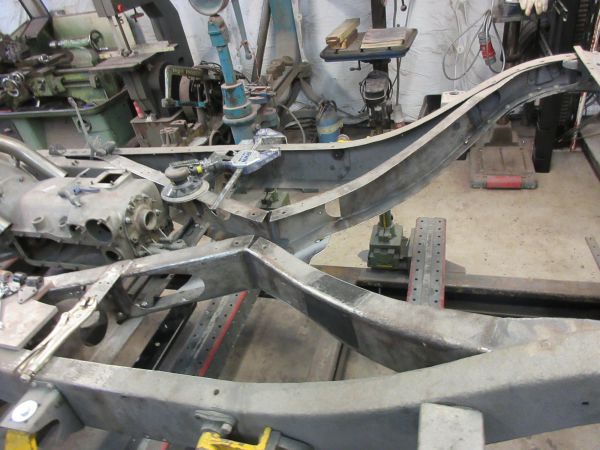
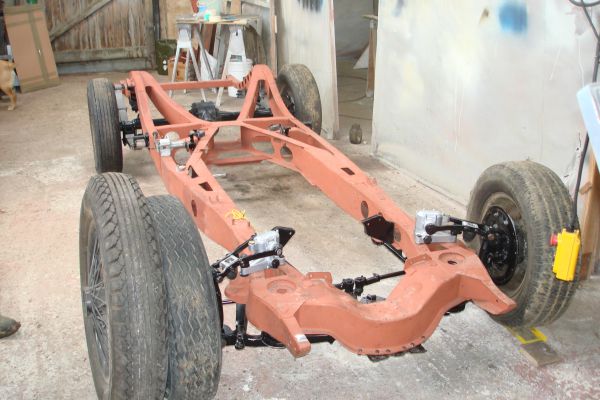
As requested Chris!
Here's the rear end
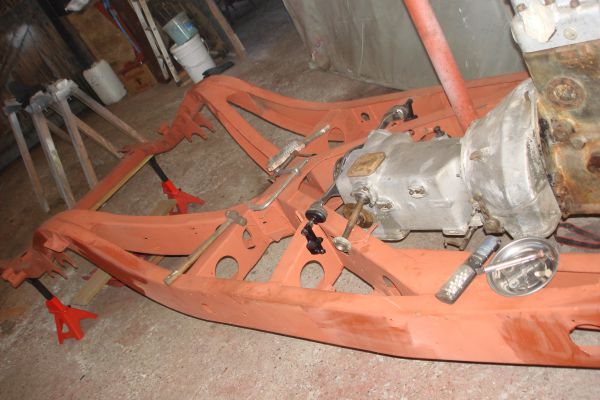
And this is supposed to porttray the entire chassis
It took 70 hours to modify the chassis - that includes carting it to the media-blaster and back. Two hours just to remove the old bodywork bracketry and prep for primer.
I've fabricated one engine mount as a test piece - I plan on getting the two finished ones complete over the next few days, then I'll return the engine to its stand and continue cleaning and prepping it for paint.
[/img] |
|
| Back to top |
|
|
Christopher Carnley
Joined: 16 Nov 2007
Posts: 2752
Location: Yorkshire, United Kingdom
|
| Posted: Fri Jan 12, 2018 9:55 am Post subject: |
|
|
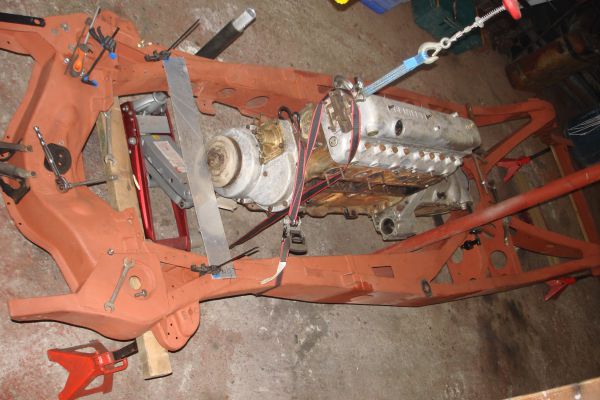
Very interesting, have you a view that looks straight down onto the chassis, ie a plan?
What are your intentions regarding the braking system? |
|
| Back to top |
|
|
Al Coutts
Joined: 25 Sep 2016
Posts: 108
Location: Norfolk, United Kingdom
|
| Posted: Fri Jan 12, 2018 10:15 am Post subject: |
|
|
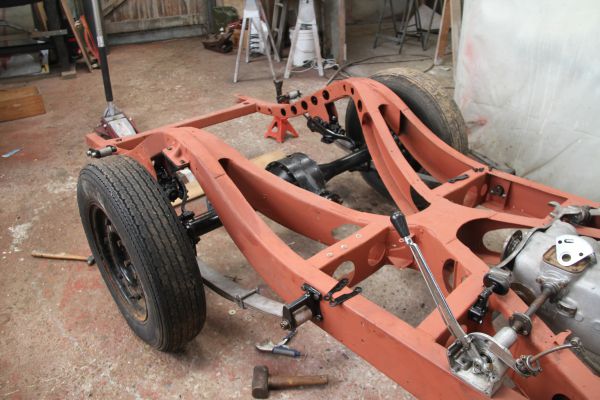
I dont have a recent one of the one you asked for Chris but if you tell me which end you want me to stand at, I'll take one this evening.
Does this help:
Brakes - I plan on re-using the original configuration. The chassis remains the same at the rear of the gearbox for that reason (amongst others). |
|
| Back to top |
|
|
Christopher Carnley
Joined: 16 Nov 2007
Posts: 2752
Location: Yorkshire, United Kingdom
|
| Posted: Fri Jan 12, 2018 3:55 pm Post subject: |
|
|
Thats OK!
I thought that you may have gone for the Mallelieu system, where he had a hydraulic slave cylinder mounted at the rear end to activate the rear brake rods.
Stephen Blakey has the details. |
|
| Back to top |
|
|
Stephen Blakey
Joined: 02 Feb 1995
Posts: 1345
Location: Derbyshire, United Kingdom
|
| Posted: Fri Jan 12, 2018 5:14 pm Post subject: |
|
|
Hi Al,
Great work and thanks for sharing. I like your load paths.
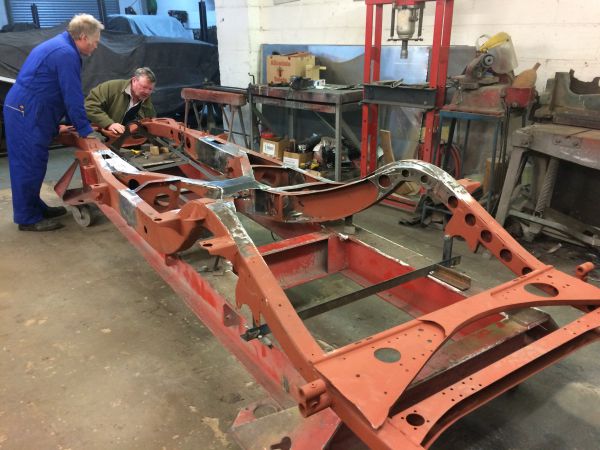
Will you be reinstating the tea tray arrangement at the top of the kick-ups? I've left mine in, however it's going to get in the way when stowing bags behind the seats so I can see it getting the chop at some point. I've fitted a 45mm CDS cross member at the rear spring hangers then chopped off everything aft of that. The pressed rear cross member was a bit mangled anyway, as so many are. Yours looks alright. There's too much rear overhang on the MKVI (and even more on the R Type which I'm using) for some body styles.
Here's a chassis at Jeremy Padgett's works when we went there on the recent BDC visit. I thought the welding (looked like TIG) and attention to detail were very good; neater than a lot of his dad's work, in fact. The "scheme" looks similar to yours.
 |
|
| Back to top |
|
|
Stephen Blakey
Joined: 02 Feb 1995
Posts: 1345
Location: Derbyshire, United Kingdom
|
| Posted: Fri Jan 12, 2018 5:34 pm Post subject: |
|
|
| Christopher Carnley wrote: | Thats OK!
I thought that you may have gone for the Mallelieu system, where he had a hydraulic slave cylinder mounted at the rear end to activate the rear brake rods.
Stephen Blakey has the details. |
Chris,
On a point of pedantry, I think you mean "she". The vast majority of the Mallalieus were built on Pauline's watch. The rear hydraulics were on the later cars so she would have signed those off, as it were.
It's true I have photographs of at least two such installations, if anyone is interested. Also one where the slave cylinder was mounted on the bar going back to the compensator (not a Mallalieu). I did come up with a scheme using a slave cylinder & bellcrank, in the cruciform, pulling on the brake rod. That's currently shelved and I'm looking at installing Jaguar XK140 rear cylinders which also incorporate the handbrake mechanism. My guess is that these are what was used on the car whose accident damaged axle you repaired.
I don't suppose you took any close ups of them that you could share with us?
Of course this is only the second iteration and I'm not the only special builder to observe that satisfaction is usually achieved at the third attempt. |
|
| Back to top |
|
|
Christopher Carnley
Joined: 16 Nov 2007
Posts: 2752
Location: Yorkshire, United Kingdom
|
| Posted: Sat Jan 13, 2018 11:29 am Post subject: |
|
|
There are nit-pickers and pickers of nits!
I recollect now, it was on the MK VI "Toad" Special with the Renault hammered bent rear axle, in 2016.
Unfortunately, about 4 months ago, the PC tower broke down completely, and refused to let me down load all the files, so I have been scraping pics up from the email prog.
The only ones to Mel Cranmer were of that other destoyer the Lagonda G10 gearbox, seized on the road due to the hands on ministrations by Mr U No WHO!
Are there any on this site from then?
PS,Just those on the Harry Rose thread. It was a slave cylinder activating a bell-crank, but the details evade me. |
|
| Back to top |
|
|
Al Coutts
Joined: 25 Sep 2016
Posts: 108
Location: Norfolk, United Kingdom
|
| Posted: Sat Jan 13, 2018 5:13 pm Post subject: |
|
|
The "tea-tray" was removed to finish the welds on the kick-ups. At this stage I don't know if it will be going back - it just held the gascolator and cross fuselage pipe and cable runs.
Once I've decided about fuel tank installation, I'll consider whether or not I need the tea-tray! |
|
| Back to top |
|
|
Al Coutts
Joined: 25 Sep 2016
Posts: 108
Location: Norfolk, United Kingdom
|
| Posted: Sun Jan 28, 2018 10:33 pm Post subject: |
|
|
Rear axle installed, prop-shaft mods determined. Drive train now out to fit engine bearers and sort out pedal fulcrums and install front suspension. Slow but constant progress. I know the gear lever is on the wrong way around - it was just pushed on to help line things up!
Found this today - some lovely work but not sure about the air intake on the vertical bonnet door....
 |
|
| Back to top |
|
|
Christopher Carnley
Joined: 16 Nov 2007
Posts: 2752
Location: Yorkshire, United Kingdom
|
| Posted: Mon Jan 29, 2018 10:06 am Post subject: |
|
|
Good!
How many leaves have you removed? Beware of the back end hop, and wicked axle tramp!
Don,t forget to put the reinforcing strips back on.
The gearbox mount and the gate have to be so aligned that the elector shaft is not binding on the top of the frame, and more importantly that the selector droplever will move across the selector jaws in the bottom of the gearbox itself.
This came up with a well kown specialist down South, when they let the "lad" do it.
The lad replaced it as previous , and previous was "binding".
The end customer was a little put out "It is alright until it warms up", and the "Specialist" had no idea what I was on about. It got sorted, eventually.
That car that should have a "K" at the end was one of a pair by a guy in Lancs, I did some work for him a few years ago, but what?
The car was a scrapper, originally numbered AWG1 |
|
| Back to top |
|
|
Al Coutts
Joined: 25 Sep 2016
Posts: 108
Location: Norfolk, United Kingdom
|
| Posted: Mon Jan 29, 2018 11:17 am Post subject: |
|
|
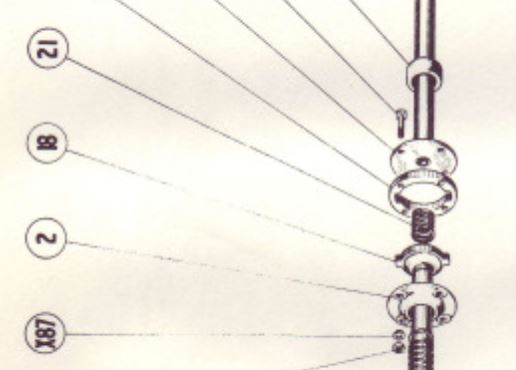
Thanks Chris - I've only removed one spring for now. By reinforcers, I assume you mean the U shaped band that is tightened with a bolt through the top of the legs of the U?
I guess I'm missing a component that sits between the selector shaft on the g/box and the output shaft from the gear lever. Would you have a photo/drg of that area?
All other points noted, thank you! |
|
| Back to top |
|
|
Christopher Carnley
Joined: 16 Nov 2007
Posts: 2752
Location: Yorkshire, United Kingdom
|
| Posted: Mon Jan 29, 2018 12:02 pm Post subject: |
|
|
No the 4 black bits on the top.
Download the Silver Dawn Parts List FOC from RROCA site PW Technical Library.
Section G, see exploded parts. Send close up of what you have to me.
C |
|
| Back to top |
|
|
Al Coutts
Joined: 25 Sep 2016
Posts: 108
Location: Norfolk, United Kingdom
|
| Posted: Mon Jan 29, 2018 10:21 pm Post subject: |
|
|
Excellent resource (not just you Chris the RROCA site, too!)
I'm missing -18 and -21. I can't imagine that machining the circular key which is 0.125" thick and finding a suitable spring beyond me. I'm guessing the key fits outsid ethe 4 retaining bolts or has detentes that accept the bolt diameter and stop it turning?
Al |
|
| Back to top |
|
|
Al Coutts
Joined: 25 Sep 2016
Posts: 108
Location: Norfolk, United Kingdom
|
| Posted: Mon Jan 29, 2018 10:23 pm Post subject: |
|
|
| On closer inspection - zooming out the drg, I can see exactly what it is and can machine one. Any hints on the spring? |
|
| Back to top |
|
|
Christopher Carnley
Joined: 16 Nov 2007
Posts: 2752
Location: Yorkshire, United Kingdom
|
| Posted: Tue Jan 30, 2018 9:50 am Post subject: |
|
|
I have a spare No14 if that is what you mean, send me your address PM.
The spring is about 1" long and is a compression spring used to stiffen the otherwise floppy joint.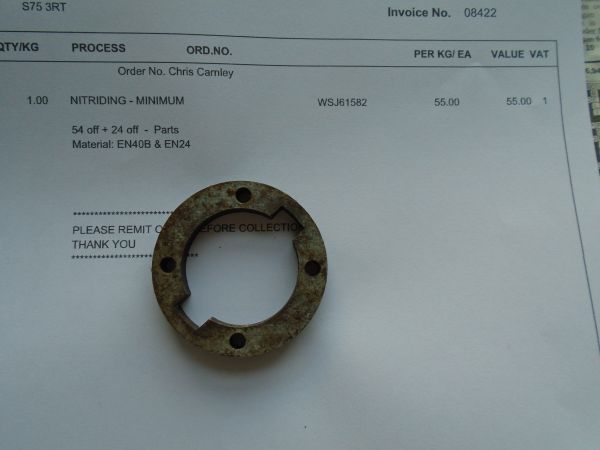 |
|
| Back to top |
|
|
Christopher Carnley
Joined: 16 Nov 2007
Posts: 2752
Location: Yorkshire, United Kingdom
|
| Posted: Tue Jan 30, 2018 11:25 am Post subject: |
|
|
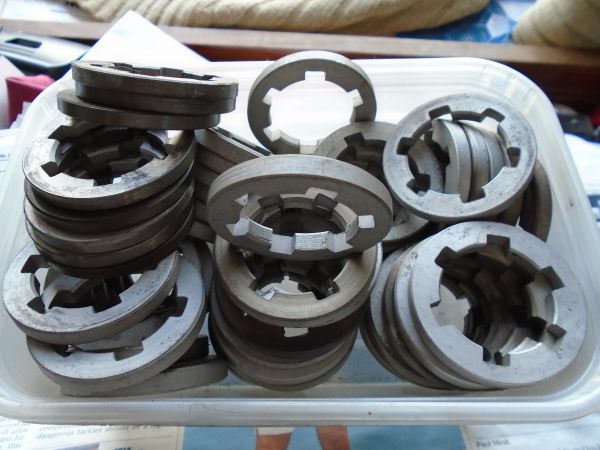
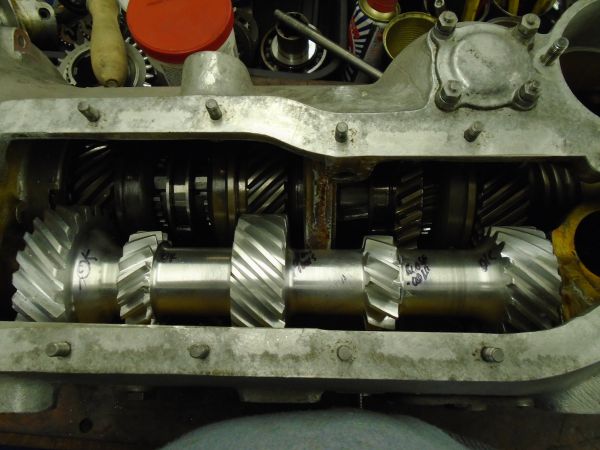
I used up all the 3rd speed driven gear thrust washers, so I made up a few (56) out of a couple of dog ends of EN40B (3% Cr) and Summit Glow nitrided them.
Along with 24off ,4th speed synchro shells.
 |
|
| Back to top |
|
|
Al Coutts
Joined: 25 Sep 2016
Posts: 108
Location: Norfolk, United Kingdom
|
| Posted: Tue Jan 30, 2018 4:09 pm Post subject: |
|
|
| How did yoy broach the iunternal keyways? |
|
| Back to top |
|
|
Christopher Carnley
Joined: 16 Nov 2007
Posts: 2752
Location: Yorkshire, United Kingdom
|
| Posted: Tue Jan 30, 2018 4:59 pm Post subject: |
|
|
Apart from a spline broach and die at around £2000.00, what other ways are there to cut them equispaced, for a lot lot less than that?
I have used 4 of them this week.
You should be asking about machining EN40BT!
14 is ITP so let me know OK? |
|
| Back to top |
|
|
Al Coutts
Joined: 25 Sep 2016
Posts: 108
Location: Norfolk, United Kingdom
|
| Posted: Tue Jan 30, 2018 10:01 pm Post subject: |
|
|
Excuse the appalling spelling on my last post! My point was even simpler, I don't really know how the broach works and am unfamiliar with UK steel specs but will bone up on those soon!
Copied the ITP. Thank you. |
|
| Back to top |
|
|
Christopher Carnley
Joined: 16 Nov 2007
Posts: 2752
Location: Yorkshire, United Kingdom
|
| Posted: Wed Jan 31, 2018 9:10 am Post subject: |
|
|
I am really good with gibberish and scribble.  |
|
| Back to top |
|
|
Christopher Carnley
Joined: 16 Nov 2007
Posts: 2752
Location: Yorkshire, United Kingdom
|
| Posted: Thu Feb 01, 2018 11:51 am Post subject: |
|
|
The "Thing of Beauty" on the left is the new aluminium test, second motion (lay) shaft for the standard gearbox. RG3544.
When I have cleared the benches of the 6 under overhaul, I will proceed to disect it.
The used one on the right looks similar, but it isnt the same, and it is not a Continental RG7999
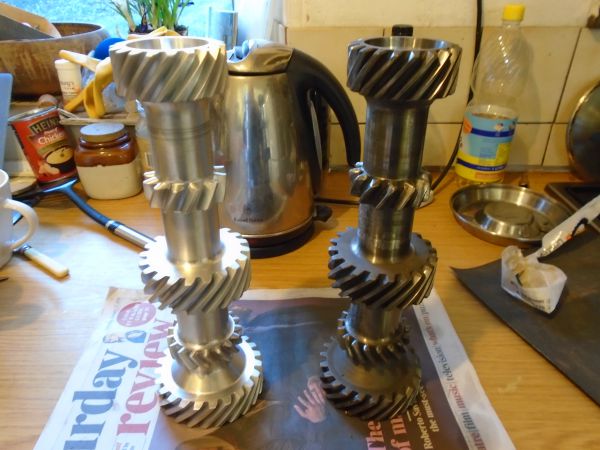
I made the wooden bowl at school when I was 15, from a 12" square x 5" thick piece of poplar wood, on a Union lathe. |
|
| Back to top |
|
|
Al Coutts
Joined: 25 Sep 2016
Posts: 108
Location: Norfolk, United Kingdom
|
| Posted: Sun Feb 04, 2018 7:43 pm Post subject: Four wheels on my wagon |
|
|
Back on 4 wheels for the first time in a very long time.
The offside engine mount fouls the steering arm, so will need to be re-designed and fabricated.
Am awaiting a quote for the splined hub adapters. |
|
| Back to top |
|
|
Christopher Carnley
Joined: 16 Nov 2007
Posts: 2752
Location: Yorkshire, United Kingdom
|
| Posted: Mon Feb 05, 2018 10:05 am Post subject: |
|
|
Al,
Which engine are you intending to install and is it going to be too low?
Have you considered a deep cradle mounted on top of the frame?
The trial 2nd motion shaft test for fit. Good on length, excellent mesh, a little tight for backlash on 3rd CM, and a bit open on 1st.
The end result will be the first successful new RG3544 since 1965.
A well known parts supplier had 8 trial ones made on the advice of an "engineering consultant" ie "Ing", not only were they were badly finished and very noisy, as it is impossible to make something like this either in isolation or from a worn part or even the drawings.
 |
|
| Back to top |
|
|
Al Coutts
Joined: 25 Sep 2016
Posts: 108
Location: Norfolk, United Kingdom
|
| Posted: Wed Feb 07, 2018 9:44 am Post subject: |
|
|
Hi Chris, apologies for delay. Initially the 4 1/4. I checked heights and it should be okay, it will sit above the steering rods. Once the monster-truck wheels are on, the front of the chassis will sit 40mm higher anyway.
Your 2nd motion shaft is beautiful. I'm not really sure what it does except spin around its longitudinal axis in the gearbox and I'm not sure what an RG3544 is - perhaps you could explain!
PE unable to assist - he was v helpful but there is no compatibility. TY |
|
| Back to top |
|
|
Stephen Blakey
Joined: 02 Feb 1995
Posts: 1345
Location: Derbyshire, United Kingdom
|
| Posted: Thu Feb 08, 2018 11:16 pm Post subject: Re: Four wheels on my wagon |
|
|
| Al Coutts wrote: | | Am awaiting a quote for the splined hub adapters. |
Hi Al,
My quote from Orson Equipment arrived this morning. I'm using type 52 so I can fit Jag XK140 wheels which are cheap. I presume you are using vintage wheels?
It looks like I'll retain the scroll seals at the front as there is barely room for anything else and, anyway, they work.
Thanks for the updates,
Stephen |
|
| Back to top |
|
|
Al Coutts
Joined: 25 Sep 2016
Posts: 108
Location: Norfolk, United Kingdom
|
| Posted: Fri Feb 09, 2018 12:24 pm Post subject: |
|
|
I've been waiting fotr 2 weeks for a quote from the same people! What are scroll seals? I've had the parts manual printed out - so I can put it all back together in some semblance of order!
Currently working on the pedal set up and then it will be brake system. |
|
| Back to top |
|
|
Christopher Carnley
Joined: 16 Nov 2007
Posts: 2752
Location: Yorkshire, United Kingdom
|
| Posted: Fri Feb 09, 2018 1:09 pm Post subject: |
|
|
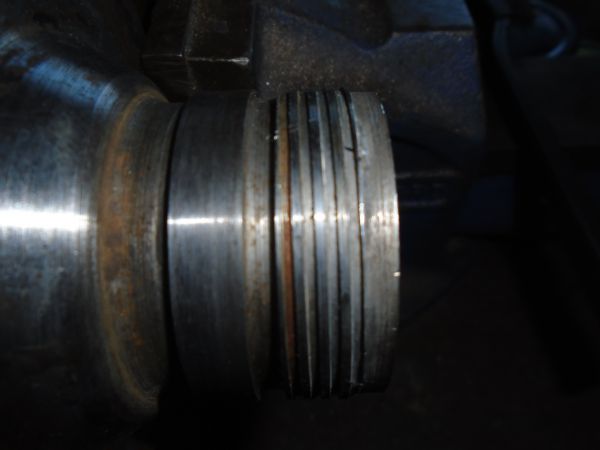
The "Scroll" is a square screw thread, so designed that the oil is directed back into the casing or the device.
Some have decided that it is an "Acme" thread, but it isn,t. The Acme is different.
 |
|
| Back to top |
|
|
Al Coutts
Joined: 25 Sep 2016
Posts: 108
Location: Norfolk, United Kingdom
|
| Posted: Fri Feb 09, 2018 2:20 pm Post subject: |
|
|
| Thank you, Chris. |
|
| Back to top |
|
|
Stephen Blakey
Joined: 02 Feb 1995
Posts: 1345
Location: Derbyshire, United Kingdom
|
| Posted: Fri Feb 09, 2018 3:48 pm Post subject: |
|
|
Al,
The part I was referring to is the innermost component of the front hub assembly. It wouldn't have looked out of place on Didnah's steam engine, though that's not the only reason for keeping it.
Like many people, I've had some fairly unpleasant experiences dealing with experts so I reckon Orsons are going to find me a rather obsessive client. My plan is to design the front hubs myself and 3D print them so I can do a trial assembly to make sure the bearings, scroll seal, brake drum and wheel all end up in the right place.
It's tempting to move the wheel rim/tyre out a few mm as the proximity of the tyre and the outer steering joint looks rather alarming as standard. Doing so would alter the scrub radius. More questions than answers, as usual.
Stephen
(Typed on my phone without reading glasses so any resemblance to sense may be entirely coincidental) |
|
| Back to top |
|
|
Christopher Carnley
Joined: 16 Nov 2007
Posts: 2752
Location: Yorkshire, United Kingdom
|
| Posted: Fri Feb 09, 2018 6:20 pm Post subject: |
|
|
Remember "Toad" and "bumpsteer"! Too much hang over, extra track and big silly wheels.
Apart from the "Didnah", you did well.
The part is an internally scroted "grease retainer".
I bought some threaded hub pullers from Orson,for an E Type Jaguar rear axle I did last year. The tools were OK, but the hubs were a b-----r to get off.
Do you remember "Mork and Mindy", Mork was an alien. "Mork calling Orson". |
|
| Back to top |
|
|
Al Coutts
Joined: 25 Sep 2016
Posts: 108
Location: Norfolk, United Kingdom
|
| Posted: Fri Feb 09, 2018 7:06 pm Post subject: |
|
|
Thank you, Stephen. I had to revert to Wikipeadia to learn what scrub angle is and as I really don't know enough about any of this stuff, I've ordered The Automotive Chassis - Engineering Principles from the local library.
Are there any other books worth reading to inprove my knowledge and in particular build a Bentley Special, out there?
I keep asking Geoff Simpson millions of questions - he has an enyclopeadic knowledge and as his build is 6 months ahead of mine, he's overcome the issues that I'm discovering. And he's bloody funny, too! |
|
| Back to top |
|
|
Christopher Carnley
Joined: 16 Nov 2007
Posts: 2752
Location: Yorkshire, United Kingdom
|
| Posted: Sat Feb 10, 2018 10:39 am Post subject: |
|
|
"Bentley Specials and Special Bentleys" Ray Roberts has a section, but you could buy a lot of parts for the price of the book now.
Read the last sentence of the Wiki article which states what I was saying above. |
|
| Back to top |
|
|
Al Coutts
Joined: 25 Sep 2016
Posts: 108
Location: Norfolk, United Kingdom
|
| Posted: Sat Feb 10, 2018 10:43 am Post subject: |
|
|
I have vol II of the Roberts book. I've had Vol 1 out of the library and cant see why it justifies its enormous price tag.
Off out to clean and prime more brake system parts - will it ever stop? |
|
| Back to top |
|
|
Stephen Blakey
Joined: 02 Feb 1995
Posts: 1345
Location: Derbyshire, United Kingdom
|
| Posted: Tue Feb 13, 2018 11:08 pm Post subject: |
|
|
Hi Al,
I don't know much about steering or suspension design, hence my inclination is to try and stay fairly close to standard. I've got a pal who has been designing and building racing cars all his adult life who, for example would answer my concerns about spring rate by saying "It's not the rate I'm concerned about but the natural frequency". Quite. I'll ask around about suspension texts. It looks like the front end goes into positive camber on roll anyway, so the whole thing is going to be an almighty compromise. Having said that, as Paul Forty has demonstated, they can be made to go round corners at phenomenal speeds.
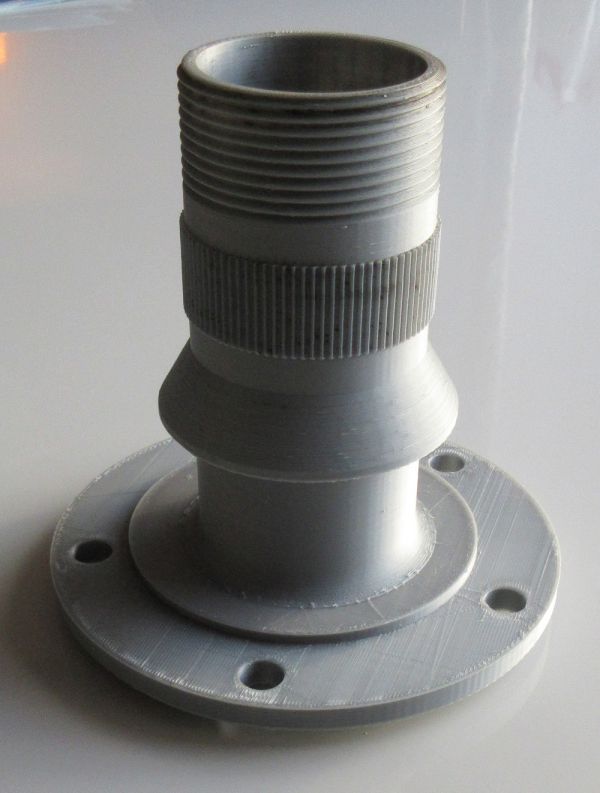
Here's my attempt at a 3D printed type 52 hub. It is slightly surreal watching things like this just grow from nothing in the corner of the lounge. This is definitely the way to make one's mistakes. It cost less than 1% of the cost of having a real one made and there were a couple of errors in it. I fitted the bearings and bolted it on to the car. The knock-on nut even went on which was a pleasant surprise. One outcome is that I need to allow a better provision for getting the larger bearing out. I may have to smash it up for that. You can't do that with a real one. I've ordered the wheel studs (now brake drum studs) so the next trial fit should be the complete assembly including the brake.
 |
|
| Back to top |
|
|
Al Coutts
Joined: 25 Sep 2016
Posts: 108
Location: Norfolk, United Kingdom
|
| Posted: Wed Feb 14, 2018 7:46 am Post subject: |
|
|
That is just phenomenal. Shame there's no process for hardening your plastic creation and using it in real-life!
Very impressed.
I've got a couple of days away at the Defence Academy but will continue to turn my clutch alignment tool when I get back as flywheel on and I plan on mating gearbox to engine and dropping it into the chassis as one unit onto the new engine bearers.
Still need to install pedals - but there is SO much to do, I can cherry-pick activoities as they fit my mood, time available! |
|
| Back to top |
|
|
Christopher Carnley
Joined: 16 Nov 2007
Posts: 2752
Location: Yorkshire, United Kingdom
|
| Posted: Wed Feb 14, 2018 10:42 am Post subject: |
|
|
Stephen,
What is the thread diameter,as 52 is just a number?
How will you fit the oil seal scroll? |
|
| Back to top |
|
|
Stephen Blakey
Joined: 02 Feb 1995
Posts: 1345
Location: Derbyshire, United Kingdom
|
| Posted: Wed Feb 14, 2018 12:49 pm Post subject: |
|
|
Chris,
There is a partial table of Rudge Whitworth dimensions part way down this post;
http://forums.aaca.org/topic/230104-dimensions-for-rudge-whitworth-72-mm-splined-hubs/
Gary Ash has written extensively on the subject and, from memory, ended up having a set of 72's made in Asia because no one else wanted to do it. It seems there is a dearth of information on these hubs.
On mine the thread is 8 TPI 60 degree and I ended up using the UNC profile as it's prettier than ISO and looked like it would be fairly compatible with most things. Of course Orson's will put their own profile on the real thing.
Jaguar have deviated from the standard with the thread and spline lengths so I've copied those dimensions from an XK140 hub.
I've carried over the scroll seal groove from the Bentley hub. I'll post a picture of that when I'm back at the computer.
Stephen |
|
| Back to top |
|
|
|


